1-800-540-905
Info@HomesteadSupplier.com
7am-4pm Pacific Time Mon-Fri
1-800-540-9051
Info@HomesteadSupplier.com
7am-4pm Pacific Time Mon-Fri
1-800-540-905
Info@HomesteadSupplier.com
7am-4pm Pacific Time Mon-Fri
1-800-540-9051
Info@HomesteadSupplier.com
7am-4pm Pacific Time Mon-Fri
Pouring a concrete slab provides a durable, long-lasting foundation for your shed, and understanding how to pour a concrete slab for a shed is essential for any DIY enthusiast.
This guide covers all the necessary steps, from site preparation and checking for underground lines to mixing and pouring the concrete itself. We'll walk you through calculating the amount of concrete needed, building forms, and ensuring proper curing.
By following these detailed instructions, you can create a stable base that enhances the functionality and longevity of your garden shed.
What this article covers:Before you get started, gather the following tools and materials:
From our research, it's important to calculate the amount of concrete you'll need. For a 10x10 ft slab that has a shed slab thickness of 4 inches, you'll need approximately 1.3 cubic yards of concrete. Always add about 10% extra to account for spillage and variations.
Always ensure you know where any underground utility lines are located. Contact your local utility company to mark the locations. This is a crucial step to avoid dangerous and costly mistakes.
Check with your local building department to determine if a permit is required. According to our research, permit requirements vary, so ensure you're compliant with local regulations and zoning laws.
If you live in a neighborhood with a Homeowners Association (HOA), get their approval before starting. Compliance with HOA rules can save you from future headaches.
Choose a location that is level and free of obstructions. Remove any grass, rocks, or debris, and ensure the site is slightly larger than your slab size to make room for the formwork.
After putting it to the test, we've found that pouring concrete is best done in dry, moderate weather. Plan your project for a time when rain is not in the forecast and temperatures are neither too hot nor too cold.
Begin by marking the perimeter of your shed's foundation with stakes and string to outline the area where the concrete slab will be laid. It's crucial to measure the dimensions carefully and ensure that the layout is perfectly square.
You can confirm this by measuring diagonally between opposite corners; the measurements should be equal. In our experience, this step ensures your shed will sit on a well-aligned base.
Excavate the marked area to a depth of about 6 inches to accommodate the gravel base and concrete thickness. This depth allows for 2 inches of gravel underlay and a 4-inch thick concrete slab, providing sufficient support and drainage.

Use a level to ensure that the base is even, and compact the soil thoroughly to prevent settling or shifting of the slab.
Create the formwork from 2x6 lumber, which will contain the concrete pour. Assemble the boards to match the perimeter of your slab, ensuring each corner is at a right angle and the boards are level.
Secure the structure with double-headed nails, which can be easily removed once the concrete cures, simplifying the dismantling process.
Position the form on the leveled excavation site. Drive wooden stakes into the ground outside the perimeter of the form to anchor it securely. Use a carpenter's level to check that the form is flat and even
Double-check the squareness of the assembly by measuring the diagonals again, adjusting as necessary to ensure perfect alignment.
Within the confines of your form, spread a 2-inch layer of gravel. This layer is critical as it facilitates drainage and provides a stable base for the concrete, preventing cracking and shifting. Compact the gravel well with a plate compactor to create a solid, even base.
Arrange steel rebar in a grid pattern across the gravel layer, securing the intersections with wire ties. This reinforcement should be slightly elevated above the gravel base.
Use small concrete blocks or special wire chairs to keep the rebar positioned centrally within the concrete, which enhances the structural strength of the finished slab.
Before pouring the concrete, lightly mist the gravel and rebar with water. This step is important as it prevents the dry base from absorbing water from the concrete mix, which can affect hydration and ultimately the strength of the concrete slab.

Mix the concrete to a thick, workable consistency, akin to the texture of mashed potatoes. Pour the concrete into the form, using a shovel or rake to spread it evenly throughout. Ensure the form is slightly overfilled to allow for settling and screeding.
Once the form is filled, check any stakes extending above the form's top edge. Use a handsaw to trim these stakes flush with the concrete surface to prevent interference during finishing.
Place a screed board across the top edges of the concrete form and use it to level the poured concrete. Move the board back and forth in a sawing motion, pulling excess concrete towards you, and filling in low spots as necessary. This process helps achieve a flat, even surface.
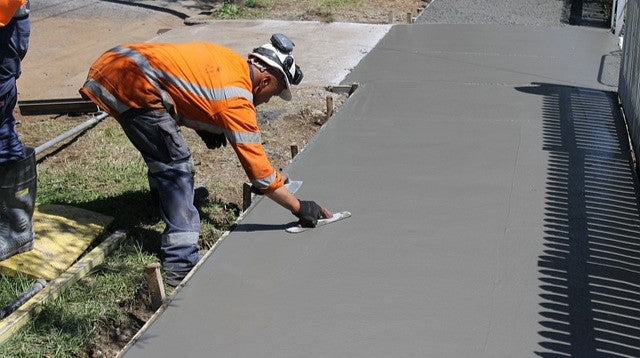
After screeding, smooth the concrete surface using a trowel or float to give it a professional finish. Then, use an edging tool around the perimeter of the slab to round the edges, reducing the likelihood of chipping and creating a more finished appearance.
Proper curing is vital for achieving maximum strength and durability of the concrete. Keep the slab moist for several days after pouring by misting it with water or covering it with plastic sheeting. This slow curing process helps prevent cracks and ensures a strong concrete slab.
Pouring a concrete slab for your shed is a crucial step in ensuring a solid and durable foundation. By meticulously following the steps outlined you'll equip your shed with the stability it needs to withstand the elements.

Each phase plays a pivotal role in the success of your project. With your new slab in place, you're now ready to build a shed on concrete.
If you're looking for high-quality shed kits, explore our range at Homestead Supplier. Get started on your project today and enjoy the benefits of a well-constructed outdoor structure.
Did our blog meet your needs? You might also find our other guides helpful:
Compare products
{"one"=>"Select 2 or 3 items to compare", "other"=>"{{ count }} of 3 items selected"}
Comments
Leave a comment