1-800-540-9051
Info@HomesteadSupplier.com
7am-4pm Pacific Time Mon-Fri
1-800-540-9051
Info@HomesteadSupplier.com
7am-4pm Pacific Time Mon-Fri
1-800-540-9051
Info@HomesteadSupplier.com
7am-4pm Pacific Time Mon-Fri
1-800-540-9051
Info@HomesteadSupplier.com
7am-4pm Pacific Time Mon-Fri
Leveling ground for a shed might seem daunting, but it's a crucial step in ensuring the stability and longevity of your outdoor structure. Through years of experience, we've honed the art of ground leveling, transforming uneven landscapes into perfect platforms for sheds.
This guide is crafted to demystify the process of how to level ground for a shed, making it accessible and manageable for everyone.
Whether you're a seasoned DIYer or a first-time shed builder, our insights and tips are designed to help you achieve a level base, ensuring your shed stands strong against the elements.
What this article covers:
Using crushed stone is an excellent way to ensure good drainage under your shed. This method is particularly useful in areas where the ground tends to get soggy or waterlogged.
To use this method, you clear and level the ground as best as you can and then spread a layer of crushed stone over it. The stone allows water to drain away from your shed, keeping the base dry.
It's a simpler and more cost-effective method compared to a concrete slab, and it's perfect for smaller or medium-sized sheds.
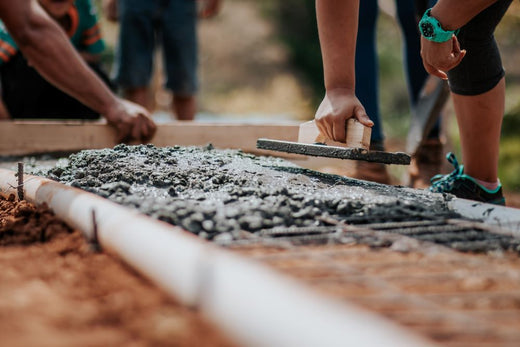
A concrete slab is a top choice for a permanent and sturdy base. It's especially good for heavy-duty sheds or in areas where the ground is often wet. The process involves pouring concrete into a framed area on the ground.
Once it hardens, you get a solid, flat surface that's not going anywhere – it's super strong and durable. In our experience, this method is a bit more labor-intensive and might require professional help, but it's worth it for a shed that needs a really solid foundation.
Concrete blocks are ideal for leveling a shed on uneven ground. They work like mini foundations that you can place under the shed's corners and other key points to create a level base, even on a slope.
This method involves less digging and is easier to adjust if the ground settles or shifts over time. It's a practical choice if you're dealing with a slightly uneven yard and want a relatively easy way to get your shed level.
Piers are the solution for building a shed on a significantly sloped area. They involve driving long, sturdy posts (piers) into the ground at each corner of the shed (and sometimes in between, depending on the shed's size).
The top of each pier is level with the others, creating a flat framework on which to build your shed. This method is more complex and might require professional equipment or assistance, but it's the best way to ensure a level, stable shed on a steep slope.
Selecting the right location for your shed is the first critical step for preparing ground for a shed. Look for a spot that suits your needs in terms of accessibility and aesthetics. Once you've chosen the perfect spot, it's time to clear the area.
This involves removing any debris, rocks, and vegetation. Clearing the site is not just about aesthetics; it's essential for creating a level base. Ensure that the area is free from obstacles that could hinder the leveling process.

After the site is cleared, the next step is to define the area where the shed will sit. Using stakes and string, mark the boundaries of your shed. This step requires precision – measure the dimensions of your shed and mark them out on the ground accurately.
Remember, accurate measurements at this stage can save a lot of trouble later on. It's crucial to ensure that the corners are square for the integrity of the shed structure.
With your area marked, it's time to start digging. Remove the top layer of soil to get to the more stable subsoil. This is where you'll level the ground. Use a shovel for digging and a rake for leveling.
As you work, regularly check your progress with a spirit level. This tool is essential for ensuring that the ground is perfectly flat and even. Pay special attention to any high or low spots, and adjust accordingly by removing or adding soil.
Once the ground is roughly level, you may encounter some low spots. Here, you'll need to add fill dirt or gravel. This step is crucial for creating a uniformly level surface.
If you're using gravel, it's particularly beneficial for drainage, preventing water accumulation under your shed. Spread the fill evenly and rake it over to ensure a consistent layer across the entire area.

After leveling the ground and adding fill, the next step is compaction. This can be done with a hand tamper or a mechanical compactor for larger areas.
After laying our fair share of foundations, we've found that compacting the soil or gravel ensures a solid base for your shed, preventing future settling or shifting.
After compacting, use the spirit level again to double-check that the entire area is still level. It's crucial to get this right for the longevity of your shed.
Depending on the type of shed and your personal preference, you may opt to add a foundation. This could be concrete blocks or piers, which are especially useful on uneven ground.
Lay these foundations out according to your shed's dimensions and shed type. Ensure they are level and firmly set in the ground. This foundation will support your shed, keeping it level and stable for years to come.
If you're not sure what the height dimension should be for your foundation, be sure to check out our guide on how high should a shed be off the ground.
Leveling the ground for your shed is crucial because it keeps the shed stable and makes it last longer. When the base is level, it stops the shed from leaning or getting damaged. It also means your shed doors will open and close smoothly.
If the ground isn't level, parts of your shed might wear out unevenly and quickly. So, leveling the ground is a key step to make sure your shed stays in good shape for a long time.

Before you start digging into the ground, it's crucial to check for any underground utilities like water lines, gas pipes, or cables.
Hitting one of these can lead to serious problems, including costly repairs and safety hazards. You can contact local utility companies to mark the location of any underground lines.
When leveling the ground for your shed, think about how water will drain around and under it. Proper drainage is key to preventing water accumulation, which can lead to wood rot or rust in your shed.
Plan the layout so that water runs away from the shed, possibly by slightly sloping the ground around it or using gravel for better drainage. This way, even during heavy rain, your shed remains dry and safe from water damage.
Rushing the process of leveling ground can lead to mistakes that might be hard to correct later. Take your time to measure, level, and prepare the site properly. It's important to double-check measurements and ensure the ground is evenly leveled.
A well-leveled ground not only makes the shed more stable but also extends its lifespan.
Leveling the ground for a shed is an essential step in your backyard project. It sets the stage for a stable, long-lasting structure. Remember, a little effort here goes a long way in ensuring your shed stands the test of time.
Looking for a shed?
Find a high quality shed kit here at Homestead Supplier.

The easiest method is using concrete blocks. They're like building blocks – simple, quick, and effective.
Using crushed stone or fill dirt is your most budget-friendly option. It's effective and easy on the wallet.
Absolutely! With basic tools and a bit of elbow grease, it's a feasible DIY project. Just remember to take your time and measure accurately.
If you want to learn more, why not check out these articles below:
Compare products
{"one"=>"Select 2 or 3 items to compare", "other"=>"{{ count }} of 3 items selected"}
Comments
Leave a comment