
1-800-540-9051
Info@HomesteadSupplier.com
7am-4pm Pacific Time Mon-Fri
1-800-540-9051
Info@HomesteadSupplier.com
7am-4pm Pacific Time Mon-Fri
1-800-540-9051
Info@HomesteadSupplier.com
7am-4pm Pacific Time Mon-Fri
1-800-540-9051
Info@HomesteadSupplier.com
7am-4pm Pacific Time Mon-Fri
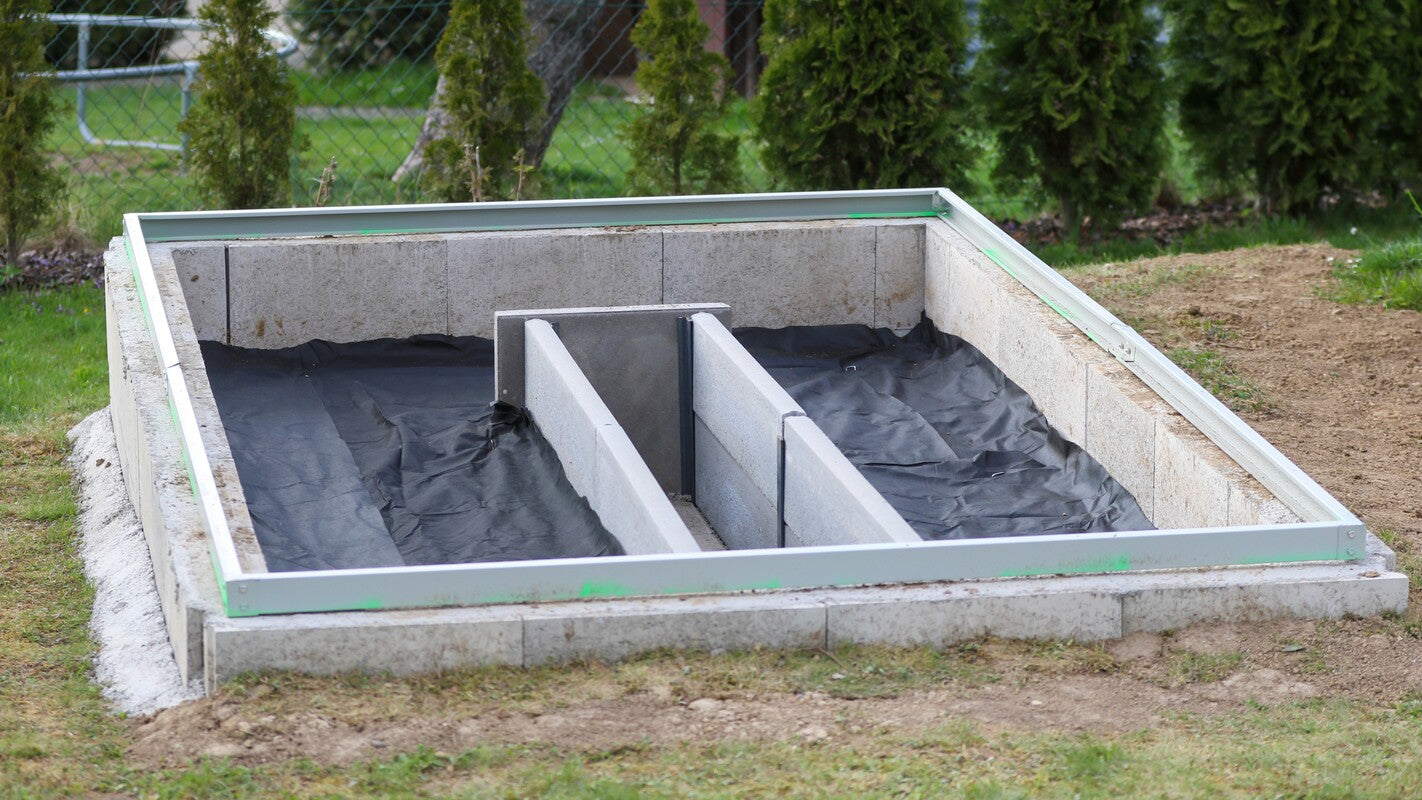
When building a greenhouse, a solid foundation is the first and most critical step to ensuring a greenhouse stands the test of time, remains stable, and functions effectively.
Knowing how to build a foundation for a greenhouse can make all the difference in maintaining proper alignment, preventing water damage, and keeping the structure secure against harsh weather.
This guide covers everything needed to create a durable base, including the tools, materials, and step-by-step instructions for various foundation types, such as wood, concrete, gravel, and block walls. With careful preparation and the right techniques, setting up a greenhouse foundation can be straightforward and rewarding.
What this article covers:
Here's a list of essentials to get started:

Here's a step-by-step guide tailored to your needs:
A concrete block wall foundation is an excellent choice for greenhouses that require added height or when installed on soft or unstable ground.
This type of foundation is sturdy, long-lasting, and can elevate the greenhouse to provide additional headroom or protect it from flooding. It also offers a polished, professional appearance that blends well with landscaped spaces, making it a great option for both aesthetic and functional purposes.
A concrete slab is an excellent choice for those seeking a durable, long-term foundation. It provides a stable, level surface and offers superior support, making it ideal for larger greenhouses or areas with challenging weather conditions.
Concrete slabs are permanent, making them well-suited for gardeners looking to establish a robust, weather-resistant base.
Wooden bases are a practical option for smaller greenhouses or projects where mobility is a priority. They are lightweight, cost-effective, and relatively simple to set up.
This type of foundation works well for those who might want to relocate their greenhouse in the future or prefer an economical choice. However, wood foundations may require occasional maintenance and aren't the best fit for high-moisture environments.
This type of foundation is a cost-effective and versatile choice that combines good drainage with ease of installation. Gravel foundations topped with pavers are perfect for gardeners who prioritize affordability and flexibility.
They work well in various climates and can easily adapt to uneven terrain. This option is also low maintenance and practical for hobbyist greenhouse projects.
Choose a location with at least six hours of sunlight daily. The best direction for greenhouse to face, whether you're deciding where to position a mini greenhouse or a full-sized one, is usually south-facing in the Northern Hemisphere.
Avoid low-lying areas prone to flooding and ensure the site has good natural drainage. Proximity to utilities like water and electricity can make future maintenance easier.
Remove grass, weeds, rocks, or debris from the site. If the ground is uneven, level it by raking or filling in low spots with soil or gravel.

This step ensures your foundation sits evenly, preventing alignment issues later.
Use stakes to mark the corners of the greenhouse site. Tie string between the stakes to outline the perimeter. Measure diagonally from corner to corner; the lengths should be equal to confirm the space is square. Adjust the stakes if needed.
To create a sturdy wooden base, start by constructing a rectangular frame using pressure-treated 6x6 timbers. Place the frame on the prepared site and ensure it is level on all sides. Use lag screws to secure the corners tightly.
For added stability, drive stakes into the ground along the inside perimeter of the frame and attach them securely to the wood. This anchors the base firmly to the ground, preventing shifting over time.
Prepare the site by setting up a perimeter form using sturdy wooden boards. Lay a 2-3 inch layer of gravel at the base of the form to promote drainage and stability. Mix and pour the concrete evenly into the form, filling it to the edges.
Use a screed or long board to smooth the surface and remove any excess. Once leveled, finish the surface with a trowel for a clean, polished look. Allow the concrete to cure for the period specified by the mix supplier and the greenhouse anchoring instructions before assembling, drilling or loading the base; full design strength takes longer than the initial set.
Begin by leveling the prepared site and laying a weed barrier to prevent vegetation from growing through the foundation. Spread a 4-6 inch layer of compacted gravel evenly across the area. Use a tamper to compress the gravel, creating a stable base.

Next, place pavers on top of the gravel, aligning them snugly together to form a flat, even surface. Use a level to check that the pavers are uniformly aligned. This foundation type is easy to install and provides excellent drainage, making it ideal for regions with heavy rainfall.
Excavate a trench approximately 6 inches deep and slightly wider than the blocks you plan to use. Fill the trench with compacted road base to create a solid foundation. Begin stacking the blocks, applying adhesive or mortar between each layer to secure them in place.
Use a level frequently to ensure the wall remains straight and even. As you build upward, stagger the blocks for increased strength and stability. Once the desired height is achieved, allow the adhesive or mortar to cure fully before proceeding.
Once the foundation is complete, position the greenhouse frame on top. Align it carefully with the edges of the foundation. Most greenhouse kits come with pre-drilled holes or brackets for anchoring.
Drill pilot holes into the foundation if necessary, then secure the frame with screws or anchors. This step is vital to keep the structure stable during strong winds or storms.
Now you can construct your greenhouse using one of our premium greenhouse kits. For more information on how to customize your greenhouse, be sure to check out our guides on how to build an aquaponics greenhouse and building solar greenhouses.

The best greenhouse foundation is the one that keeps the frame level, drains water away, matches the kit's anchoring instructions, and suits how permanent the structure will be. Compacted gravel is a practical choice for many backyard kits because it drains well and can be corrected later. A slab provides a clean permanent floor, while perimeter timbers or block walls can create a raised, defined base.
| Foundation | Best fit | Drainage | Main tradeoff |
|---|---|---|---|
| Compacted gravel | Most backyard greenhouse kits and sites that need drainage | Excellent when edged and graded correctly | Must be compacted in layers and kept square |
| Concrete slab | Permanent structures, wheeled carts and an easy-clean floor | Depends on finished slope and perimeter drainage | Higher cost and difficult to alter later |
| Pressure-treated timber perimeter | Small to medium kits on a prepared gravel bed | Good when water cannot collect against the wood | Wood eventually needs inspection and maintenance |
| Concrete block or stem wall | Sloped sites, added height or a masonry perimeter | Good with a drained footing and correct backfill | Requires careful footing and frost planning |
Establish a fixed reference line with stakes and mason's string, then measure down to the excavated surface at several points. Do not follow the existing ground if it slopes. Remove high spots first; filling deep low spots with loose soil creates a base that can settle.
After setting the perimeter, compare both diagonal measurements. Equal diagonals confirm the rectangle is square. Recheck after each lift of gravel is compacted and again before anchoring the greenhouse. A small error at the foundation can become a door-alignment or panel-fit problem at roof height.
Keep surface water out of the greenhouse by extending the prepared area beyond the frame where the kit and site allow, using compacted angular aggregate rather than rounded pea gravel for the structural layer, and grading the surrounding soil away. Do not create a raised dam around the base that traps runoff.
Foundation work should follow the greenhouse, not the other way around. Compare the exact footprint with our greenhouse dimensions guide, plan beds and walkways with the greenhouse layout guide, and review the manufacturer's base and anchoring requirements before ordering material.
If you are still choosing a structure, browse the live greenhouse kits collection first. Once you know the model, confirm its delivered base dimensions, door location, anchoring system and any site-preparation notes. In exposed locations, pair the foundation plan with the guide to securing a greenhouse from wind.
Creating a solid foundation is essential for the stability, durability, and functionality of your greenhouse. Whether you choose a wooden base, a concrete slab, gravel with pavers, or a concrete block wall, each option offers unique benefits tailored to different needs, budgets, and climates.
With the right foundation in place, you can focus on what truly matters—cultivating your plants and enjoying the fruits of your labor. If you're ready to start your greenhouse journey, visit Homestead Supplier for high-quality greenhouse kits and all the materials you need to get growing!
While smaller, portable greenhouses don't always require a permanent foundation, having a stable base like compacted gravel or a wooden frame can improve stability and drainage, especially in windy or rainy conditions.
The depth depends on the foundation type. For concrete slabs, walls or footings in freezing climates, local frost depth and code requirements determine the excavation depth; ask the local building department or a qualified contractor rather than relying on a universal depth. Gravel or wooden bases generally require less depth, around 4–6 inches.
Permit requirements and zoning laws vary by location. Check with your local municipality to determine if a building permit is needed, especially for permanent foundations like concrete slabs or block walls.
If you want to learn more, why not check out these articles below:
Compare products
{"one"=>"Select 2 or 3 items to compare", "other"=>"{{ count }} of 3 items selected"}
Leave a comment